Meal Summary
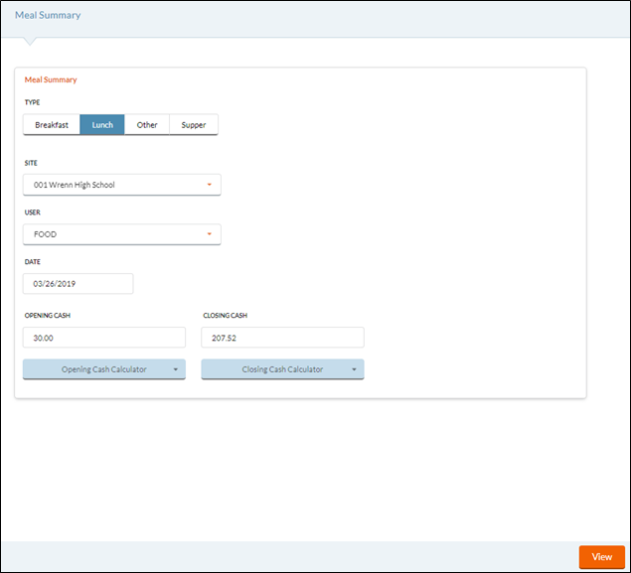
The Meal Summary includes all transactions for a single cashier for a serving site, meal and date.
-
It summarizes all sales and accruals by category, and calculates cash receipts based on the transactions that were entered when serving Breakfast, Lunch, Other or Supper Items.
-
It includes secondary site transactions entered by this cashier.
-
You can use this to track the cash collected for each meal and cashier.
-
Suggestion: Keep EACH cashier’s money and Meal Summary separate from the others until the day is reconciled; do not lump ALL money together until all counts have been verified.
-
 Why is it important to run a separate summary report for each meal and cashier?
We recommend running a separate summary report for each cashier and serving session because it allows you to track the cash for each meal separately. Then, if cash does not balance at the end of the day, you have a complete set of reports for auditing to determine when the error occurred. If meals are not reported separately, it is more difficult to track down errors.
This form is designed for use with either a touch screen or keyboard. (If you logged in with Touch Screen On you will get the touch screen format.)

- Select the meal Type (Breakfast, Lunch, Other or Supper) and Serving Site.
Serving Site is the site that was selected when logging on to the serving screen.
-
Select the name of the cashier who served from the User dropdown list.
-
Select the serving date from the Date field.
-
Enter the Opening Cash and Closing Cash amount in the appropriate fields.
-
Opening Cash is the amount of money you started with (petty cash or change fund).
-
Closing Cash is the amount when you finished serving, including the opening cash.
-
 Using the Opening/Closing Cash Calculators
You can use the Cash Calculators to enter the number of coins and bills and the checks you have and it will automatically total it for you. If all cashiers use the Cash Calculator to enter checks, they can be picked up with the Daily Deposit Cash Calculator and you can print a Checks Report to send to the bank.


When you click or touch the Cash Calculator button, it will be highlighted in orange and a keypad will be displayed. (To close the Cash Calculator, click the orange-highlighted button again.)
-
There are (2) two tabs: one tab for Cash and one for Checks.
-
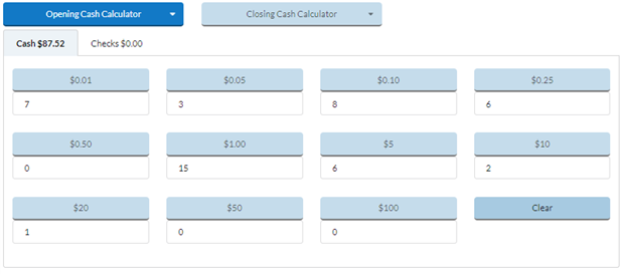
On the Cash tab, enter the number of coins and bills you have for each denomination.
-
In the example shown below, there are seven (7) pennies, three (3) nickels, eight (8) dimes, six (6) quarters, 15 ones, six (6) fives, two (2) tens, and one (1) twenty.
-
The total (87.52) is automatically calculated as you enter the coin and bill counts.
-

-
When you open the Checks tab, any check numbers that were entered in the serving screen will be listed in the grid automatically.
- Or, Click
 button to populate the grid with any available checks.
 -
It will list the payment amounts, and the Additional Info field will show the Check Number and Student # with a hyphen between them.

-
To edit a Check Amount or the Additional Info, highlight that line in the grid.
-
Then you can edit the information in the Check Amount/Additional Info fields to the right of the grid.
-
You can enter anything under Additional Info (up to 25 characters).
-
Click Enter to save your changes.
-
The Clear button removes only the current information in these fields.
-
-
To enter additional checks, type in the Check Amount and any Additional Info such as check number, student #, or bank name, in the fields to the right of the grid.
-
Click Enter to put it in the grid.
-
To remove a check, double-click the amount in the grid.
- Click
 button to remove all the check information.
 - Click or touch
 to close the Cash Calculator.
 - Click the View button to display the Meal Summary.
If the report has already been run with different amounts entered, you will get a message telling you what was entered previously. Click Yes if you want to continue with different amounts.
Meal Summary Report

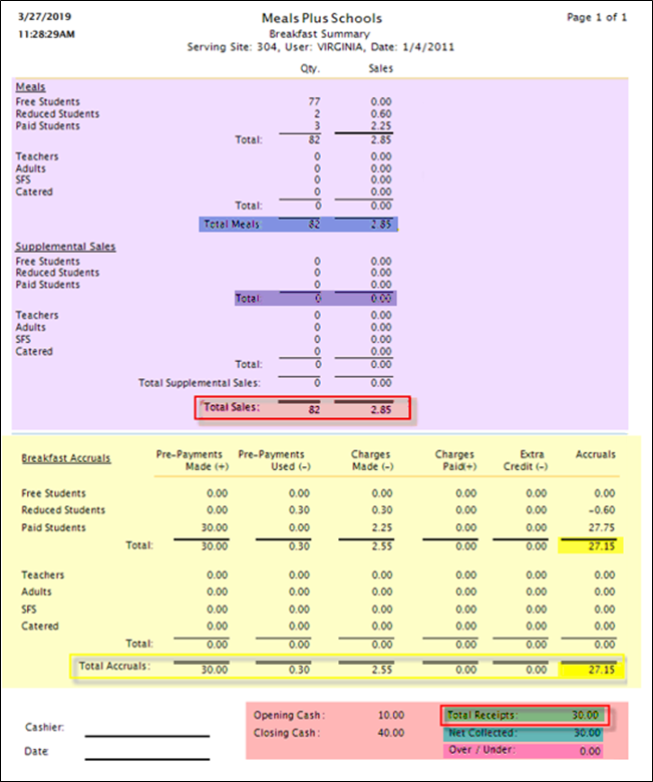
Top Section (Purple)
The top part of the report summarizes the sales transactions.
Meals Section
-
The Total Meals is all Nutrition Code 1 items.
Supplementation Sales Section
-
The Total Supplemental Sales is all other Nutrition Code items (i.e. 2, X, and Component nutrition codes).
-
The Total Sales is the amount of sales revenue that was earned, or the value of the meals sold.
- Total Sales = Total Meals + Total Supplemental Sales
Middle Section (Yellow)
The middle part of the report summarizes the accruals (prepay and charge transactions).
-
Total Accruals = Prepayments Made (+) Prepayments Used (-) Charges Made (-) Charges Paid (+), or
-
Adjustments to sales for the money that is not collected at the time of the actual site.
Bottom Section (Red)
The bottom section displays the Deposit information.
-
Total Receipts is the expected amount of cash that should have been collected (Total Sales + Total Accruals), based on all the transactions entered.
-
Net Collected is the difference between the Opening and Closing Cash. This would be the amount the cashier is turning in for that meal’s deposit.
-
Over/Under is the difference between the Net Collected and the Total Receipts.
-
If a cashier's Net Collected is over or under:
-
Re-count the money to be sure the Opening Cash and Closing Cash were entered correctly.
-
Use the Check Summary Report to verify all checks were entered.
-
-
Review the sales information at the top of the report to be sure the quantities and amounts are reasonable. It may be helpful to review the Transaction History by Date for this Meal Type and User. Purchases will be listed as B, L or O transactions. If money was received there will also be a P (payment) transaction listed at the same time.
-
The Total Sales may not match the amount of cash collected (Net Collected) because of some prepayment/charge transactions.
-
Use the Transaction History by Date Report for details (select Meal Type and User).
-
Purchase transactions begin with ‘B’, ‘L’, ‘O’ or ‘S’.
-
Payments begin with a ‘P’ (Cash transactions will have a ‘P’ at the same time as the purchase).
-
-
-
Review the accruals at the bottom of the report. You can use the Charges & Prepayment Report if you want to see details.
-
Did you Serve Offline? If so, then ensure that all ‘offline’ transactions have synched to the database.
-
-
If an error was made, you can make corrections in the Serve screen and re-run the Meal Summary, as long as the Daily Deposit Reconciliation has not been closed.
-
©2021 EMS LINQ Inc.
Meals Plus Web Help, 10/2019